Step-by-step Guide to Setting up a Codeigniter Application on AWS Lightsail


This tutorial will take you from zero to having a codeigniter app fully installed on AWS Lightsail instance.
Introduction
In this article, I will guide you to setting up the following technologies
AWS Lightsail instance
Apache
PHP
Composer
Codeigniter 4
DNS Configuration
Create a Lightsail Instance
Amazon Lightsail is a fully managed service provided by AWS (Amazon Web Services) that makes it easy to set up and manage web apps, databases, and storage services.
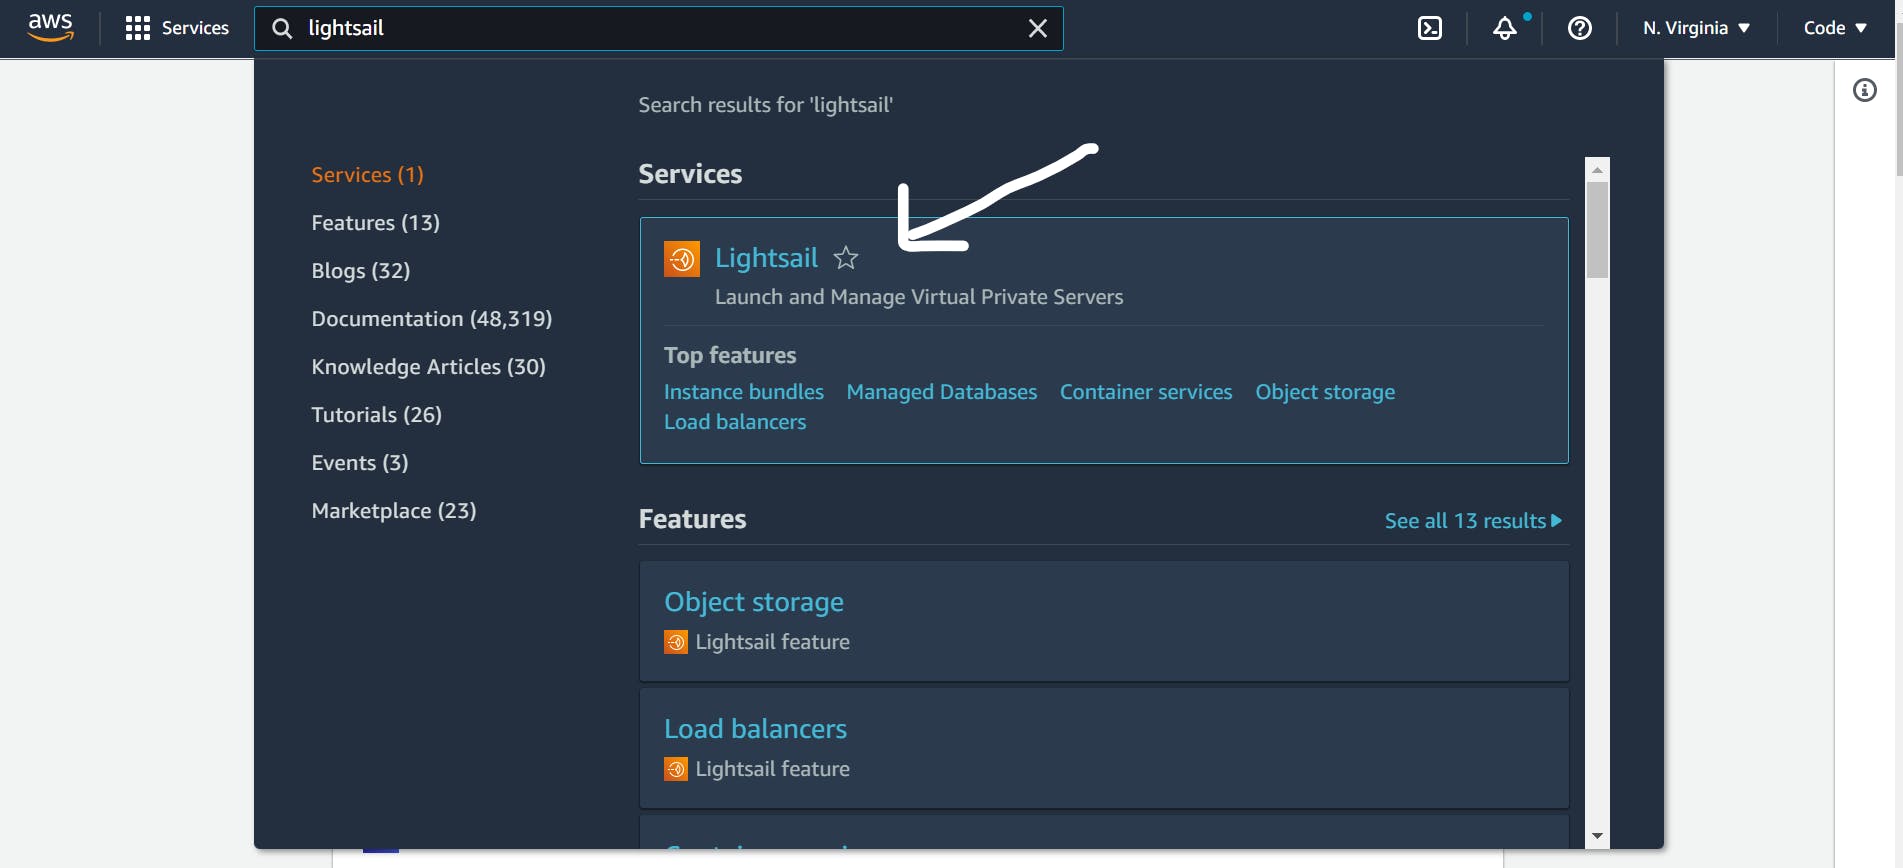
- Log onto AWS and create an account to begin. Search for "Lightsail" in the search bar at the top of the screen and click on the first result as shown below.
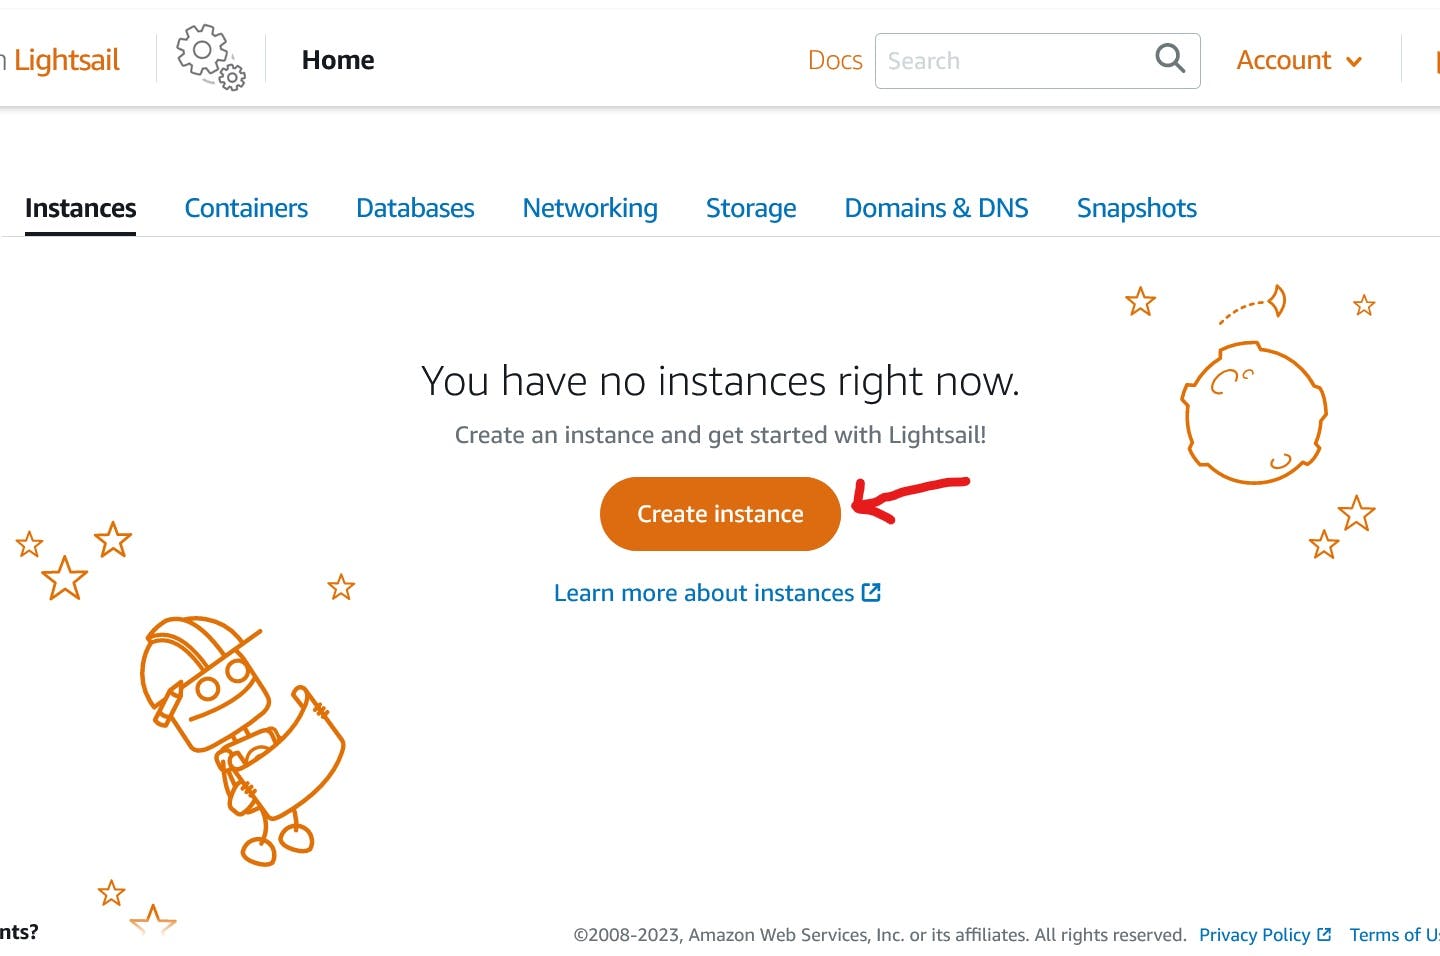
- Click on the button like is shown below to create an instance.
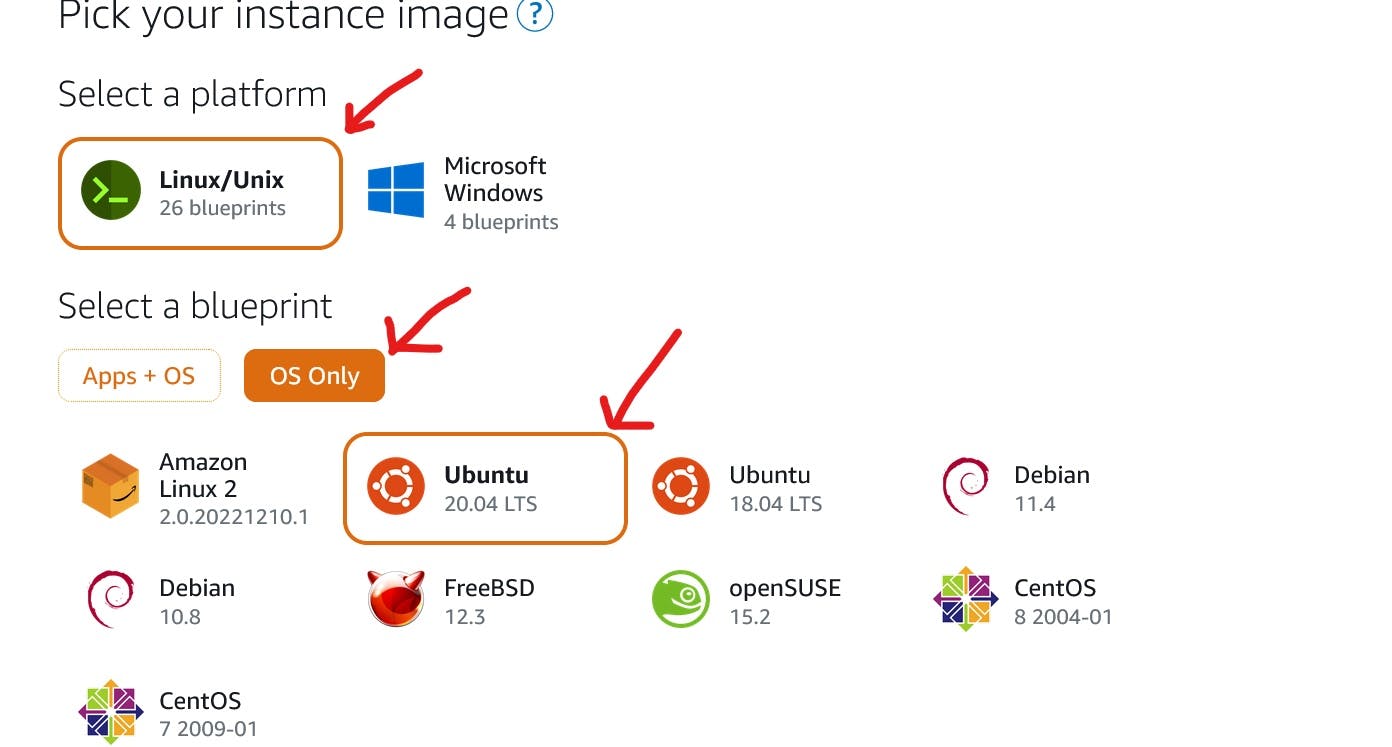
Select Linux/Unix, OS only and Ubuntu 20.04LTS to spin off a virtual machine. With this installation, we will be setting up a bare ubuntu machine.
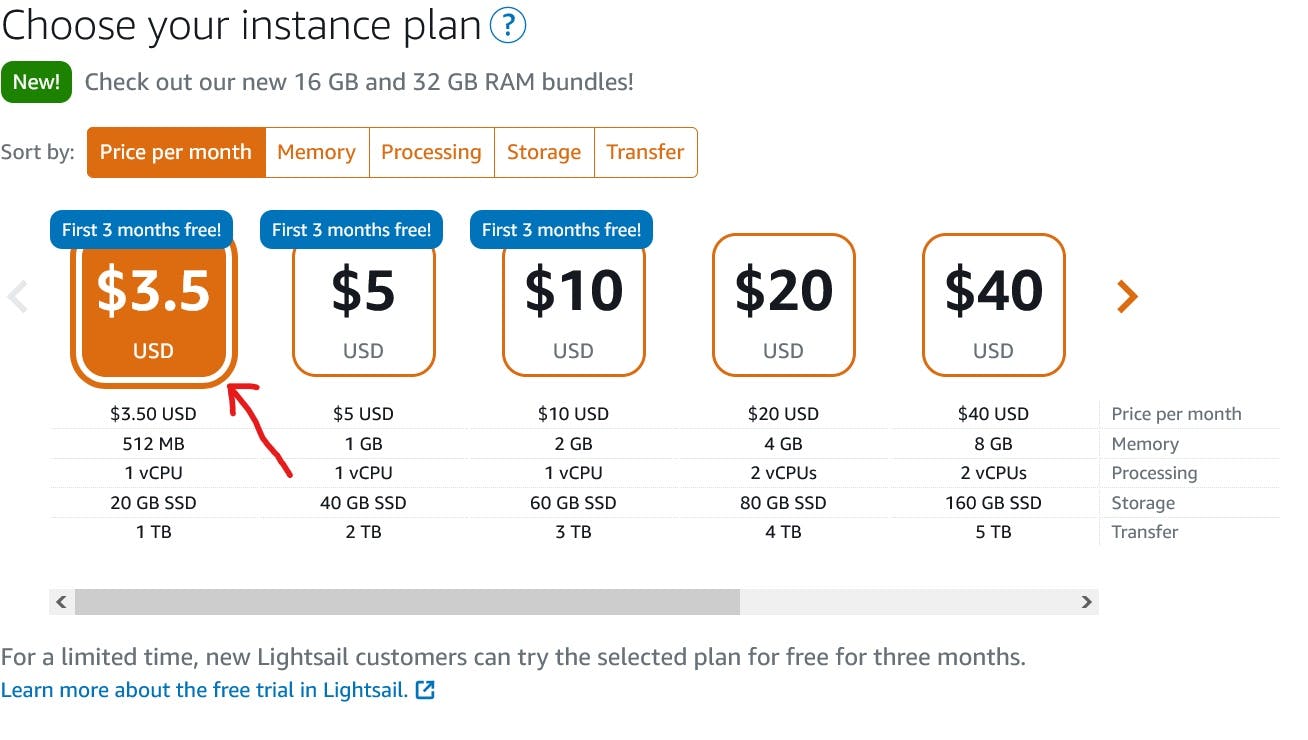
Choose a price. Lightsail comes with many pricing packages, but for the sake of this article, choose the $3.5 plan. The good thing is, you have the first 3 months free! You will be charged zilch!
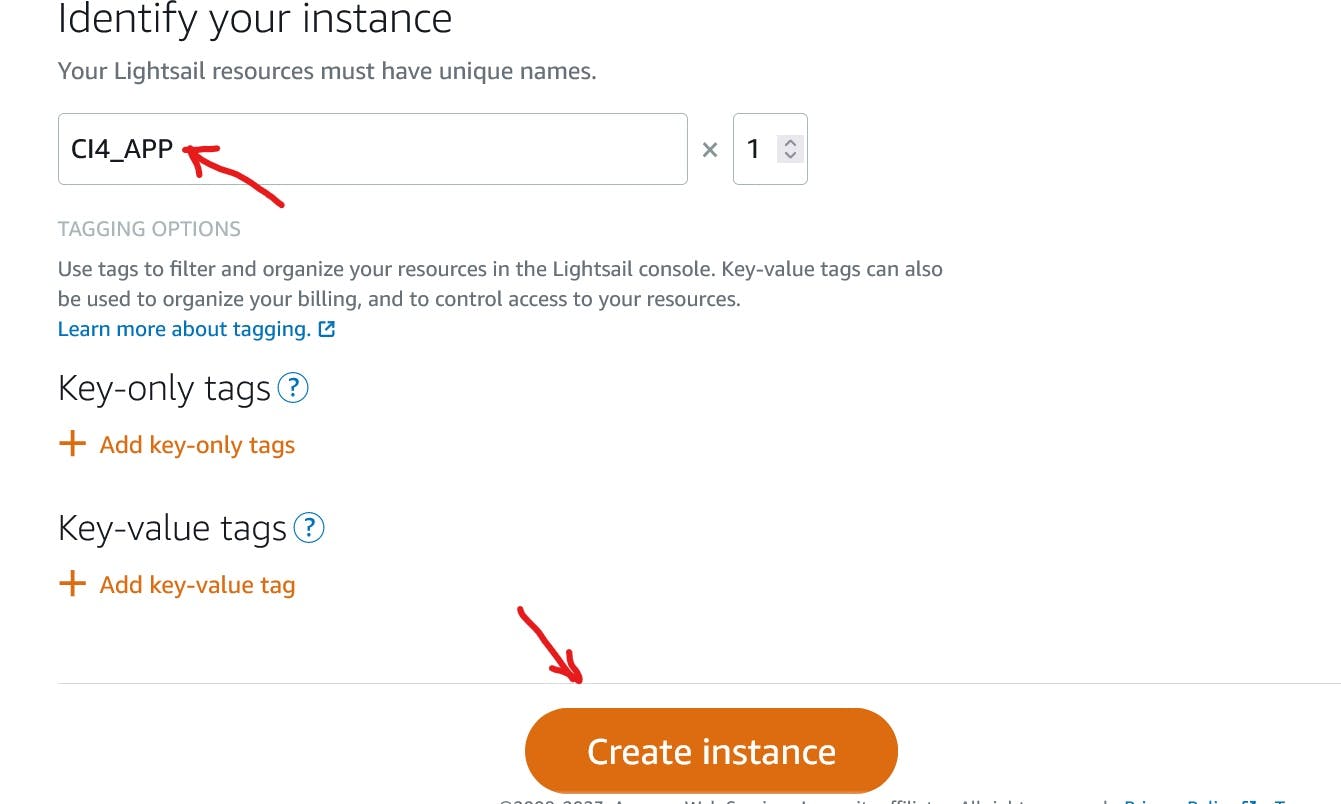
Choose a unique name for your setup and click the button to create the instance. How easy can it be!
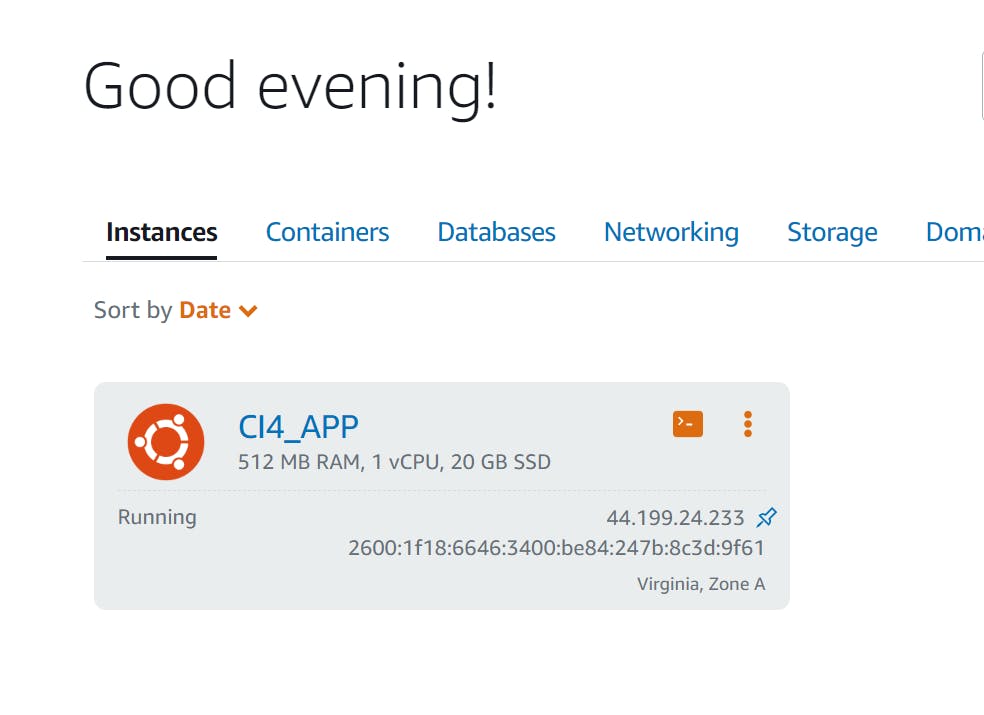
If you followed the steps carefully then you should have an instance created like below. The instance will have a dynamic public IP address attached to it. Follow the next step to create and attach a static IP to the instance.
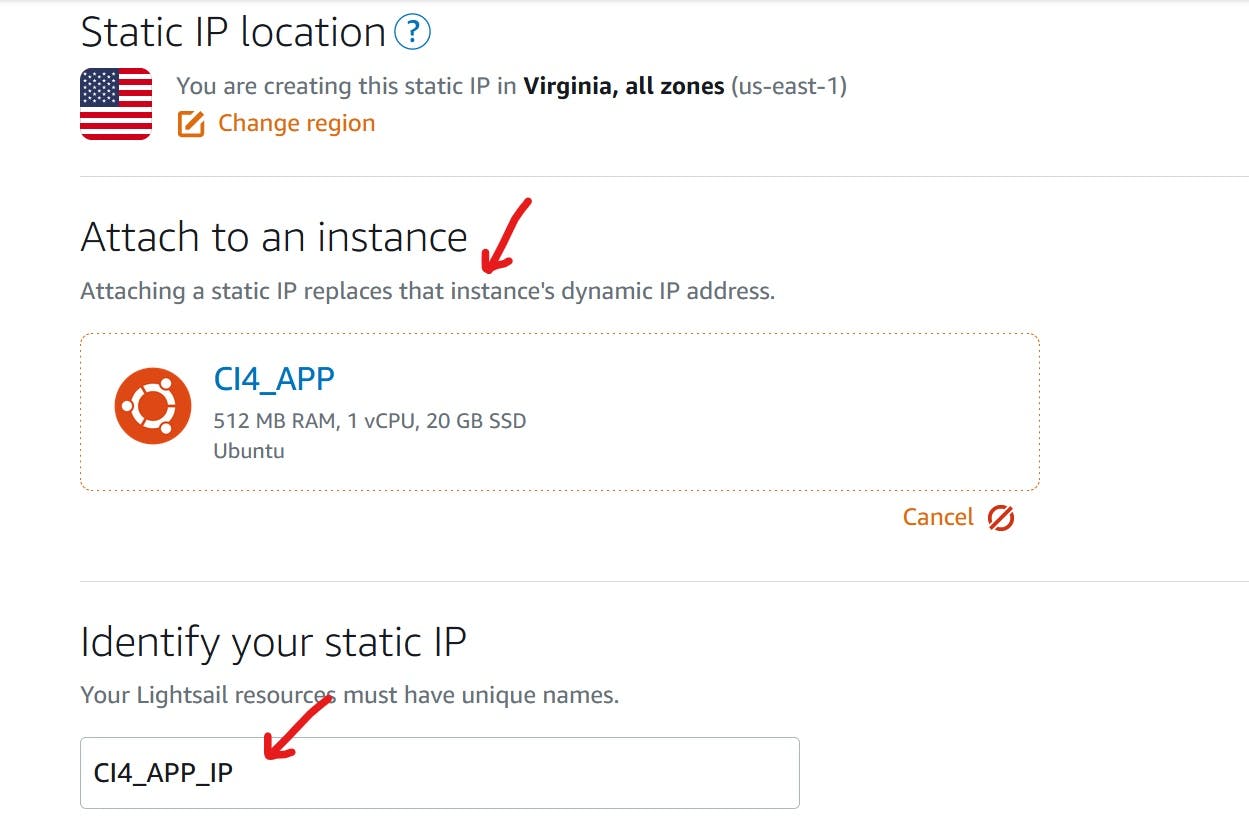
The default dynamic public IP address attached to your Amazon Lightsail instance changes every time you stop and restart the instance. Create a static IP address and attach it to your instance to keep the public IP address from changing. Later, when you point a registered domain name to your instance, you wouldn't have to update your domain’s DNS records every time you stop and restart your instance. You can attach one static IP to an instance.
Next, let's set up a static IP.
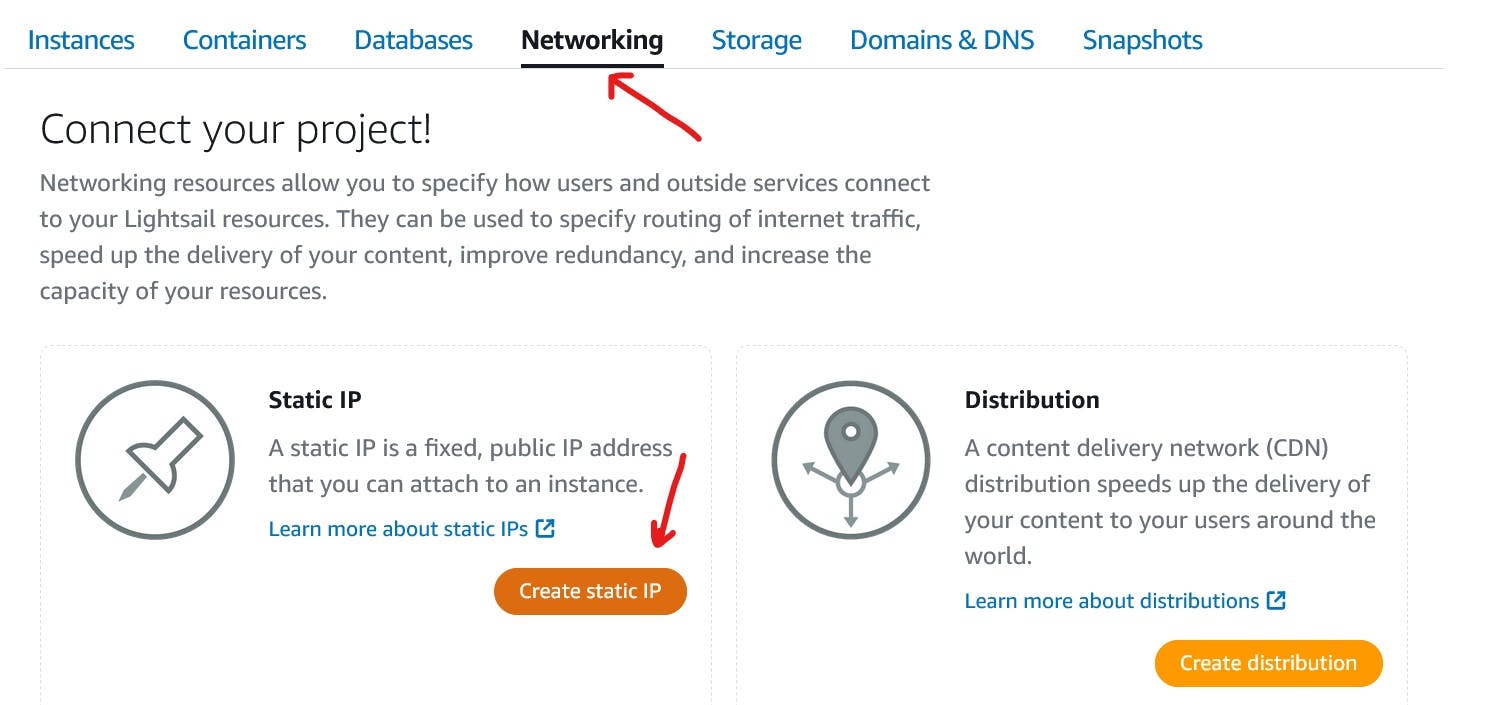
- Navigate to the 'Networking' Tab to create a static IP. See screenshot below.
Click to attach the instance to the IP. Give IP any unique name. I chose CI4_APP_IP.
At this point, you should have a lightsail instance up and ready for installing the tools needed for the app.
Install Apache
Apache is a web server software that is widely used to host websites and web applications. It is an open-source software developed and maintained by the Apache Software Foundation. Apache can be configured to host different types of content, HTML, images, and dynamic content generated by web applications.
First, navigate to the Lightsail Terminal. This is the command line tool used for configuring your ubuntu machine.
See the screenshot below...
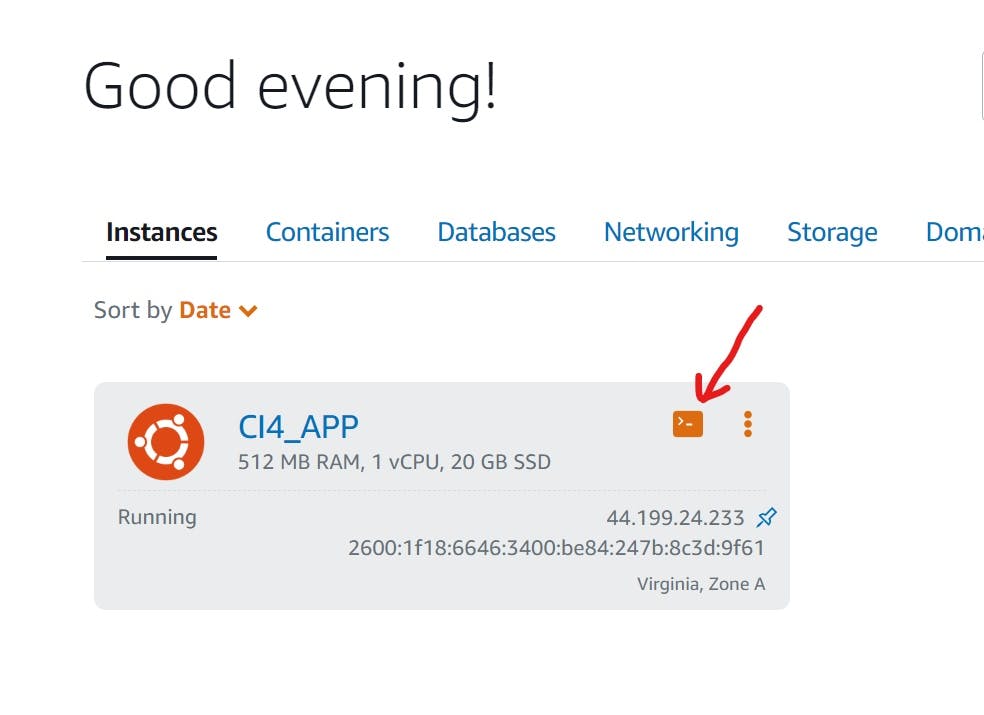
Click the icon shown in the screenshot above to open up the command line.
In the command prompt on the terminal, log in as 'ubuntu'
Run the following command below to update the 'apt' package manager
sudo apt update
Run the command below to install apache2
sudo apt install apache2
Check the installation by running the following commands. These will confirm if apache was successfully installed.
apache2 -v
sudo systemctl status apache2
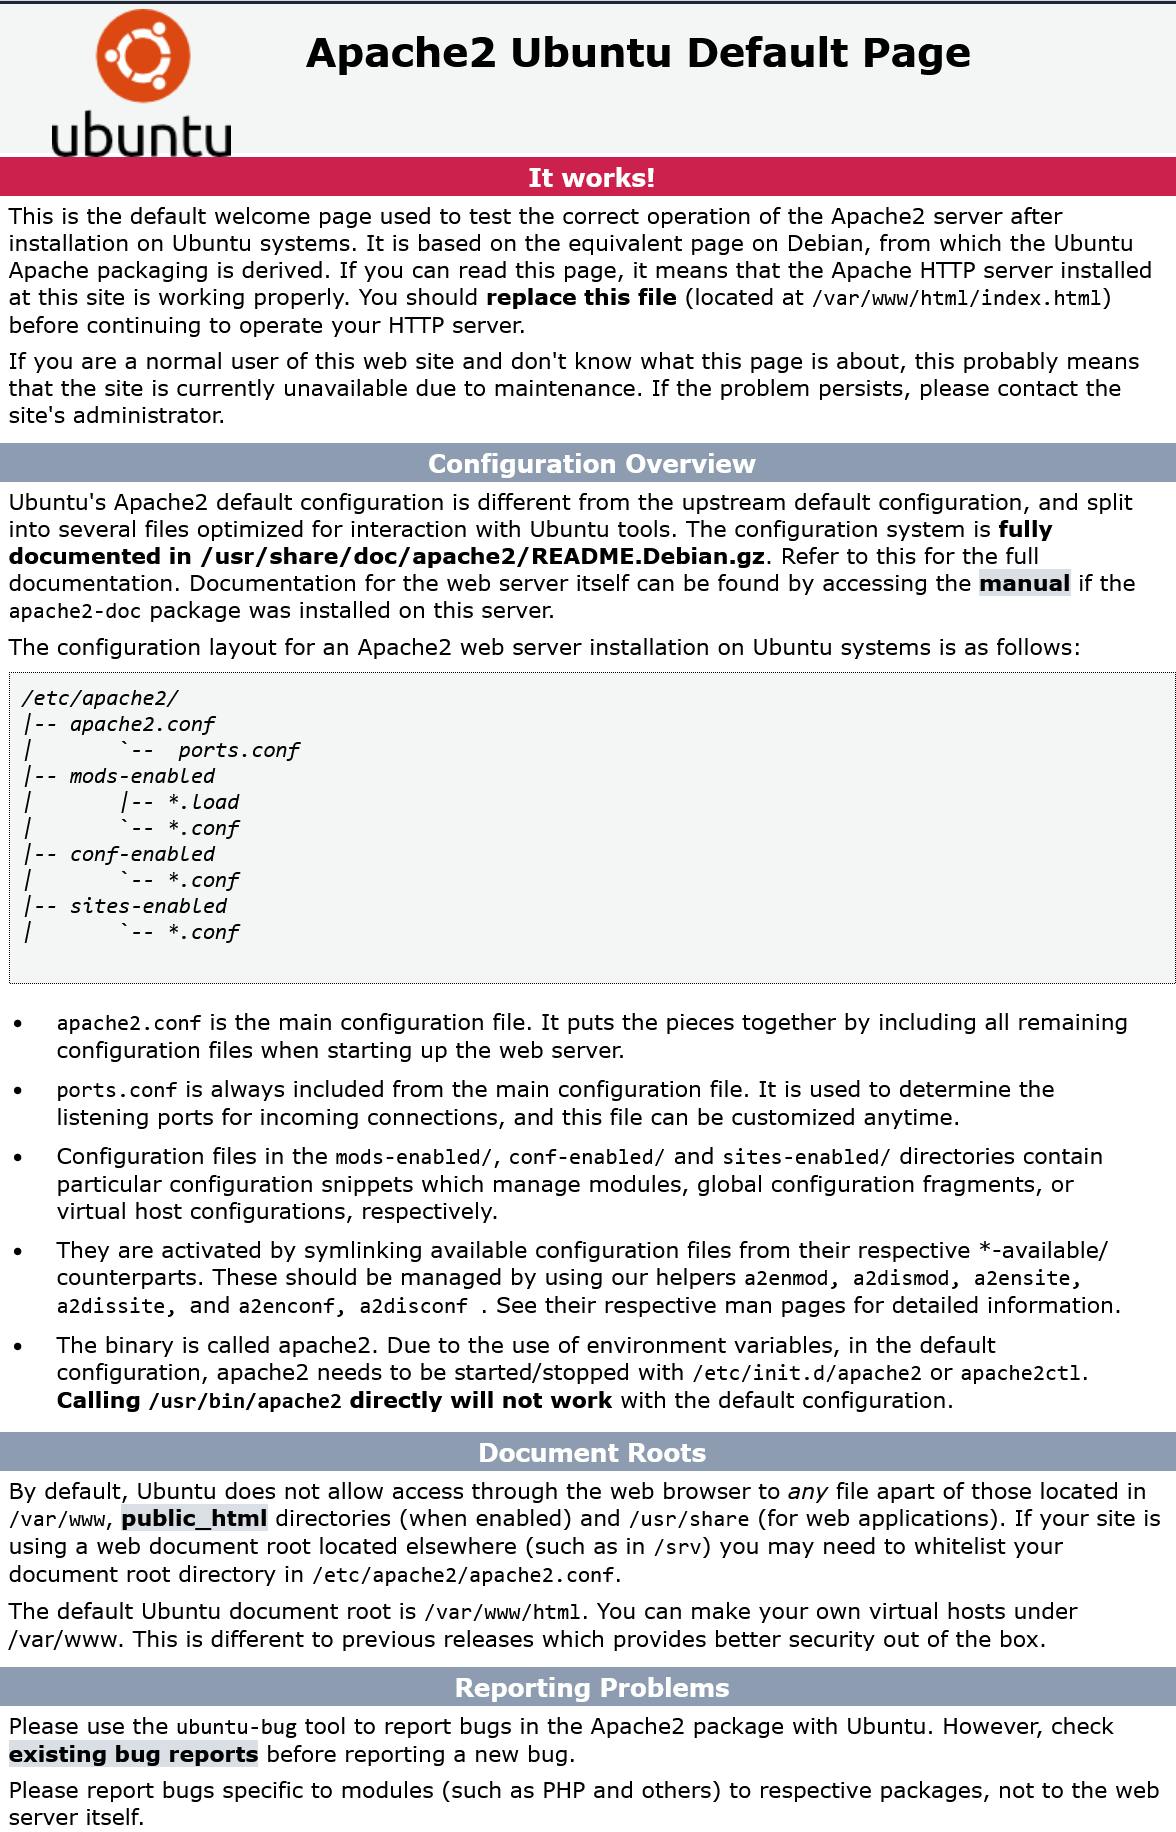
Enter your IP address in a browser to see the apache installation. If the installation was successful, you should see the default apache page as shown below. You can find your machine's IP on the instance dashboard or alternatively, type the command below.
curl -4 icanhazip.com
Install Php
Run the command below to install php and libapache2-mod-php. libapache2-mod-php enables apache to handle PHP files.
sudo apt install php libapache2-mod-php
Note:
There are dependencies that the server requires, without which the codeigniter installation would not work.
Run the command below to install the dependencies
sudo apt install php-mbstring php-intl php-curl php-dom php-xml
Install Composer
Composer is a dependency management tool for PHP. It allows developers to declare and manage the libraries (also known as packages) their projects depend on. Composer helps to manage the dependencies of a project in a structured way, ensuring that the correct versions of libraries are installed and updated as needed. We will use composer to install codeigniter.
Run each command below to install composer.
Note: You may need to check with the official Composer installation guide for an up-to-date installation procedure. Please refer to the official composer docs here https://getcomposer.org/download/
php -r "copy('https://getcomposer.org/installer', 'composer-setup.php');"
php -r "if (hash_file('sha384', 'composer-setup.php') === '55ce33d7678c5a611085589f1f3ddf8b3c52d662cd01d4ba75c0ee0459970c2200a51f492d557530c71c15d8dba01eae') { echo 'Installer verified'; } else { echo 'Installer corrupt'; unlink('composer-setup.php'); } echo PHP_EOL;"
php composer-setup.php
php -r "unlink('composer-setup.php');"
The command above will do the following
Download the installer to the current directory
Verify the installer SHA-384
Run the installer
Remove the installer
Composer will be installed in the current directory. But we will need to move it to PATH (global install), so we can call it from anywhere within our system to run installations.
Run the command below to move the composer file to PATH
sudo mv composer.phar /usr/local/bin/composer
Install Codeigniter
CodeIgniter is an open-source web application framework written in PHP. It is designed to help developers build dynamic web applications quickly and easily.
Type out the following command to install codeigniter into the current directory. I named my project folder CI4_APP. Call yours whatever you want.
composer create-project codeigniter4/appstarter CI4_APP
Codeigniter will be installed in the current directory.
However, we will move it to the /var/www directory.
Type,
sudo mv CI4_APP /var/www
- CD into or Change directory to the "www" folder by typing the command below
cd /var/www/CI4_APP
- Configure the "env" file
sudo cp env .env
The above command will create a ".env" file and copy the content of the "env" file into it.
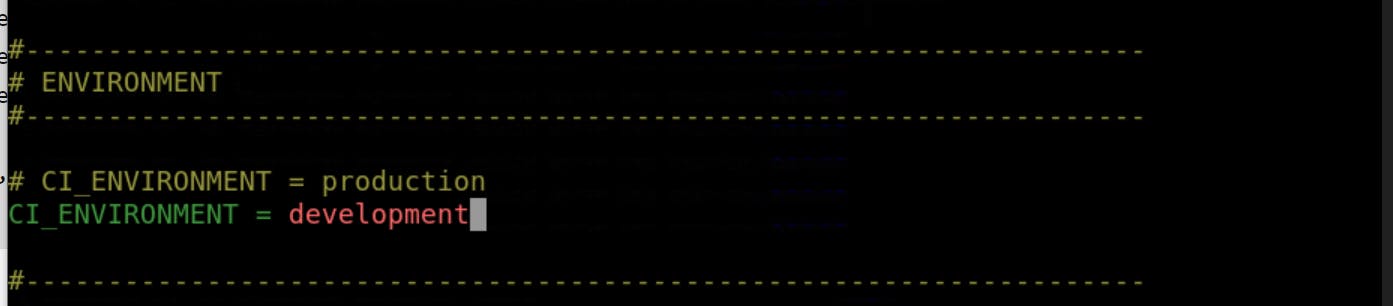
Open the .env file.
Type the command below. The command will open the .env file in the nano editor. The nano editor is preinstalled on your machine.
sudo nano .env
See the screenshot below. Add the line "CI_ENVIRONMENT = development" in the .env file opened. This will set your codeigniter app to development mode.
After typing the above, type the following commands to save the configuration and exit the editor. ctrl + o then press enter. After that hold ctrl + x to exit editor mode.
- Set permissions to the writable directory in the codeigniter folder
sudo chown -R www-data:www-data /var/www/CI4_APP/writable
Running the command above will change the ownership of the "writable" folder and all of its contents to the "www-data" user and group, which allows the web server to read, write and execute this folder. The www-data group is commonly used by web servers such as Apache or Nginx. Read more about the "writable" folder.
Configure apache virtual host
What is a virtual host?
A virtual host is a server (apache and nginx) software feature that allows the hosting of multiple web applications on a single machine.
sudo nano /etc/apache2/sites-available/CI4_APP.conf
Type the above command to create a configuration file. I called mine CI4_APP. Call yours whatever you like. The command will open up the nano editor, copy the following and paste. But make sure to change the ServerName and ServerAlias values to your own domain.
<VirtualHost *:80>
    ServerName test-am.com.ng
    ServerAlias www.test-am.com.ng
    DocumentRoot /var/www/CI4_APP/public
    <Directory /var/www/CI4_APP>
        Allowoverride All
    </Directory>
</VirtualHost>
After typing the above, type the following commands to save the configuration and exit the editor. ctrl + o then press enter .After that do ctrl + x to exit editor mode.
The above configuration creates a ServerName test-am.com.ng with the ServerAlias test-am.com.ng and points it to the DocumentRoot /var/www/CI4_APP/public. The public folder in codeigniter is where the browser-accessible content; javascript, CSS, images etc. are located. The server name above is an existing domain name on a registrar. It will be configured so it points to the instance's IP address
- Enable the virtual host by entering the command below
sudo a2ensite CI4_APP
Remember that CI4_APP is the name of my virtual host configuration file (CI4_APP.conf) as above. Yours could be anything you chose.
- Run the command below to be sure there is no error with the configuration file.
sudo apache2ctl configtest
- Reload apache so to apply all the configurations made.
sudo systemctl reload apache2
Configure DNS
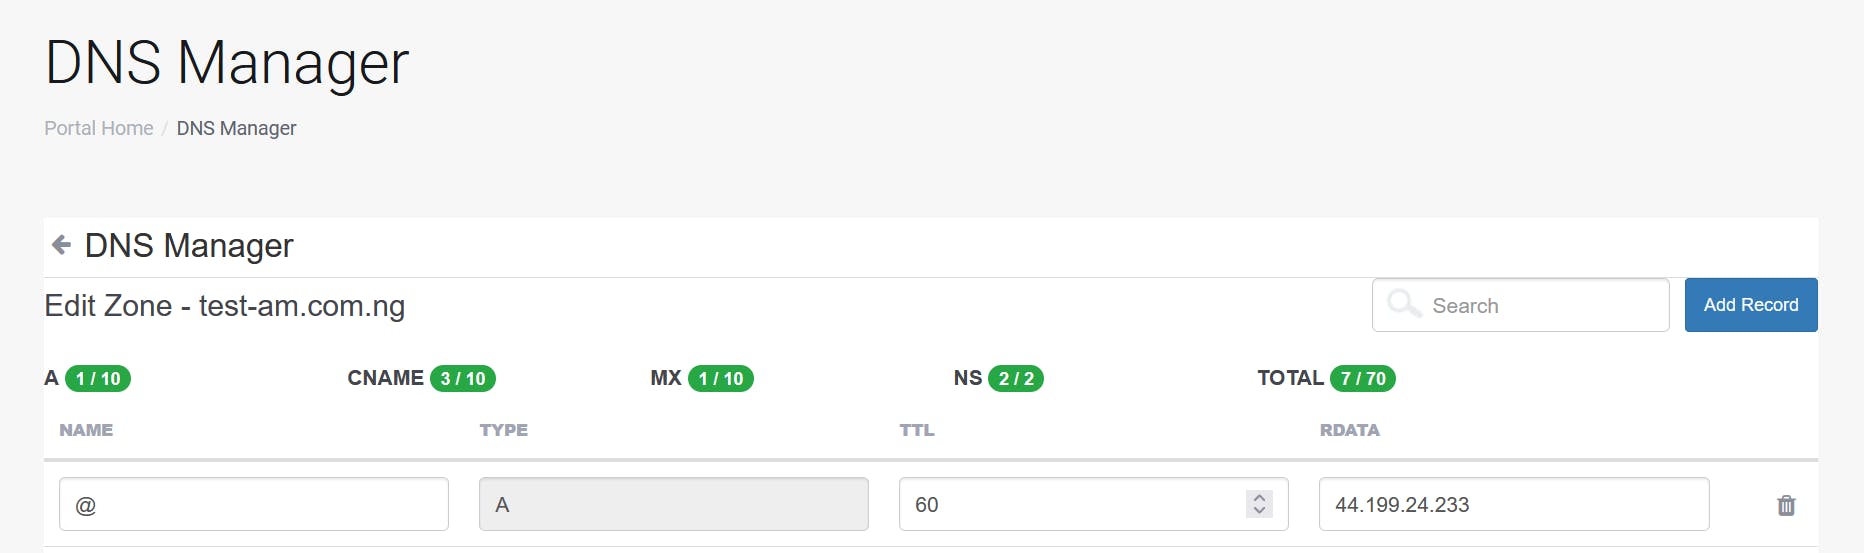
At this point, the domain name on the name registrar needs to be updated so it points to the IP address of the virtual machine or instance.
In the screenshot below, the IP address is added as the "A" or Address record. This maps to the domain name.
So anytime the domain name or URL is entered in the browser, it is resolved to the A record which is the IP address of the machine which lives on AWS servers. When the request hits the server, it goes through the virtual host created earlier and checks the server name if it matches what was entered in the browser then, it reaches into the document root and serves the requested resource.
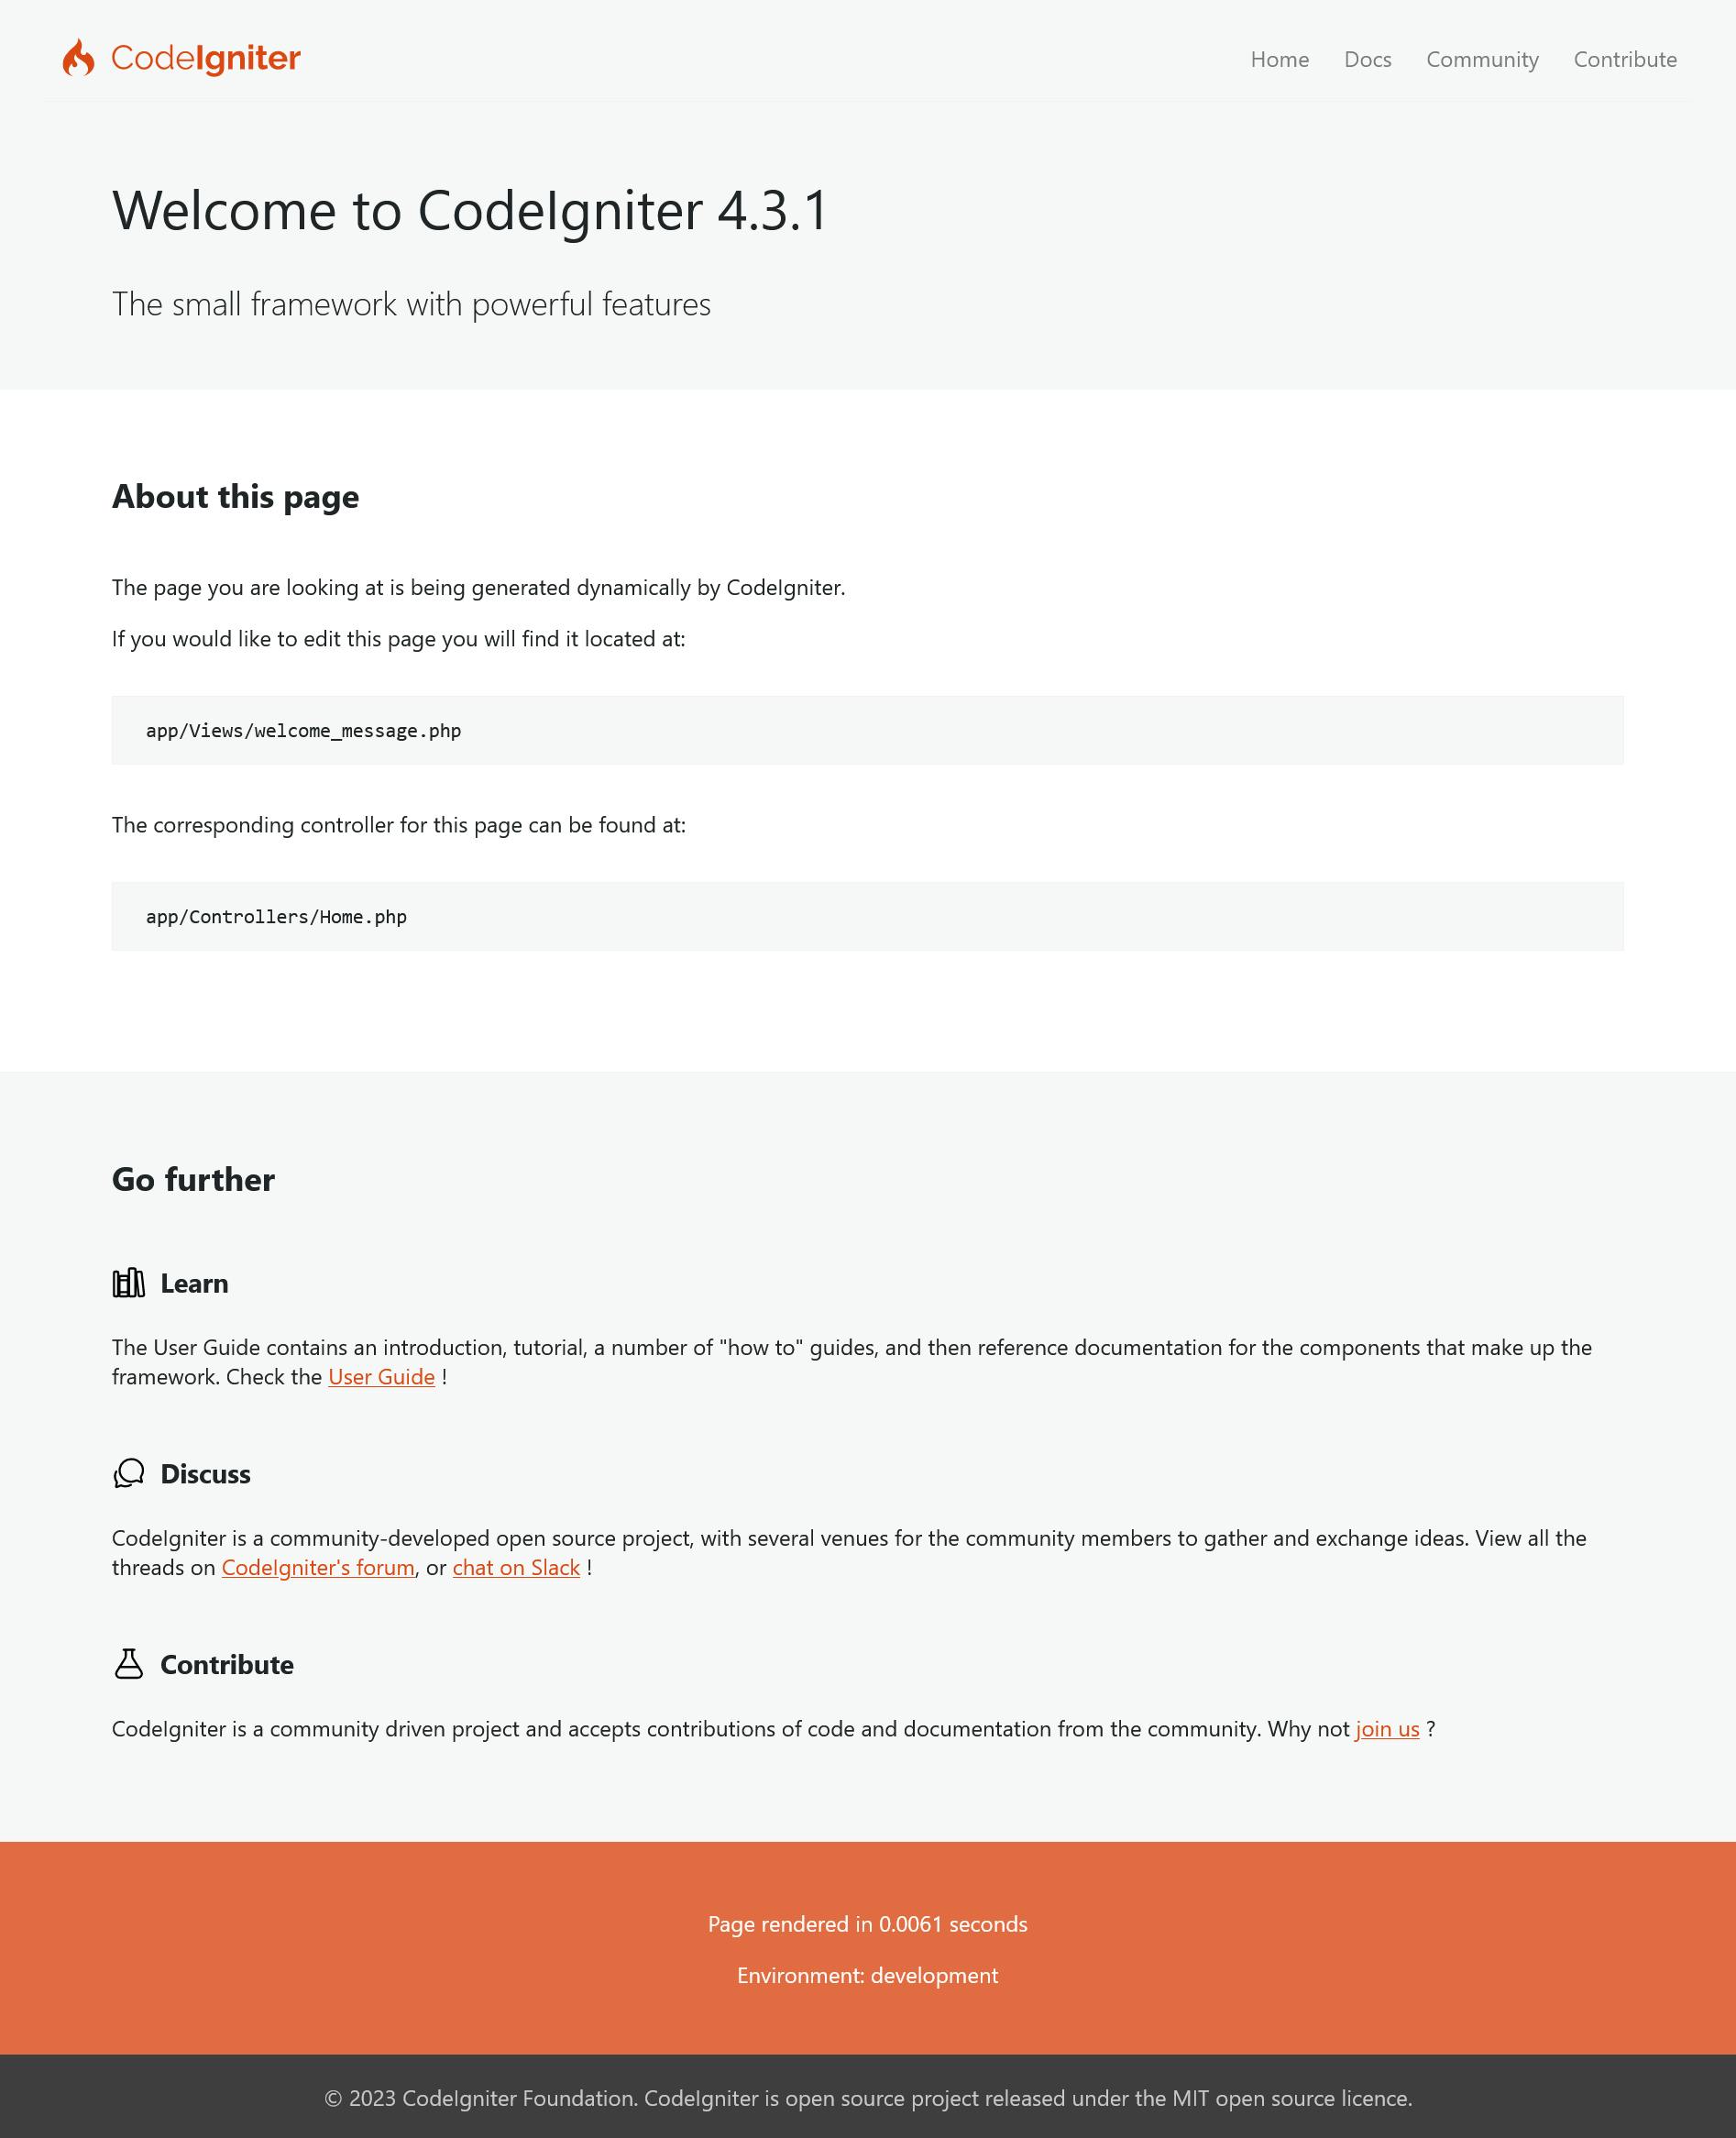
At this point, if you type the URL in the browser, you should see a default codeigniter page like the screenshot below.
If you followed up until this point, congratulations!!! It wasn't an easy feat!!! 💪💪💪
I will do a follow-up article on this, the concepts that will be included are;
Installation of an SSL certificate on the domain name
Installation of MYSQL database on the instance and configuration of the codeigniter DB settings to interact with the database.
Installation of git
Deploying a simple CRUD application written with codeigniter on the machine.